About The Cloudscapes
08.13.2021
I write about process not because it’s the most important thing about the work, but because solving these problems and finding approaches that suit the work often becomes the most time and effort consuming, it may help other workers solve similar problems, and for interested non practitioners, what goes into this work might be illuminating. We don’t just hit the “print” button. I’m afraid this is long…
In 2006 I taught a workshop at Cone Editions in Vermont, the experience and the people there put me in a particularly ponderous mood. Coincidentally during the flights back to Seattle, the skies were awesome, and I made over 100 captures out the window during both flights.
I intermittently worked on selecting, editing, and making work prints. I tried all the normal methods, the usual inkjet papers, straightforward ink setups, I felt they required a more unique presentation. Never quite satisfied with results, or encountering technical obstacles, I’d set it aside for other work and the usual overwhelming tasks of life.
During the pandemic lockdown in 2020 I experimented with printing on uncoated fine art papers. Because of some of those results, and the time available, I returned to this work hoping to find a way forward and complete it, also deciding to make snapshots along the way. I finally landed on an appealing approach with Arches Cover on full 29 x 41” sheets and a particular piezography ink setup. and settled on ten images as I saw them on paper on paper. Several issues can only be resolved seeing results on paper, particularly with some uncoated papers, the prints feel very different than the monitor presentation.
 Even though the felt side of the paper is considered “up”, most desirable, the the watermark shows correctly, uncoated papers print the same on both sides, so I did for test prints. All kinds of tests began, starting small, making changes, then bigger and bigger. Slice tests for sharpening, noise reduction and grain have to be seen at final enlargement ratio. The ink hue selections and gradations also were being refined along the way. Every time it’s tweaked, it has to be relinearized before seeing a test with an image.
Uncoated papers have a lot of paper dust and lint, some gets thrown up during printing, and combines with the ink to form a nice mud on the bottom of the heads. With increasing nozzle problems during many days of printing, I decided to do a major cleaning before starting the all the large finals. This involves cleaning the bottom of the head, something to keep in mind for anyone getting into uncoated papers, you’re going to have gunk buildup. The normal head cleaning process became more and more ineffective, so I got a new capping station pad, wiper blade, and flush pad and did all the cleaning and parts replacement before printing the final editions. With the printer apart for all this it was obvious a lot of gunk can accumulate during work with uncoated papers. To help with the lint problem I pre brushed each sheet before it went in the printer.
As the work moved forward I decided on a multiple hue split ink setup. The paper base is warm, the lightest ink is cool, so the lightest highlights are a bit silvery off the warm paper base. As values darken they crossover to a mid light warm hue, then to a cool mid hue, to a very dark warm hue, before black black. Iterative linearizations of that setup were nailed down as the testing proceeded. These hue crossovers are very subtle, not an obvious effect, and mostly contribute to a more dimensional roundness to the continuous tone monochromatic images.
 Cone’s latest black ink, HDMK, yields remarkable Dmax on matte papers, and it carries over into uncoated papers, rivaling previous results with OEM MK black inks on coated papers. I determined with experimentation that I could get more ink down without mottle and bleed, and higher Dmax, by slowing the printer down so there would be several seconds of dry time between each head pass. This slowed everything way down, at the final size, the print time was over an hour each. In this digital age that may seem excruciating, but it allowed me to get the last print flattened, and stacked, and the next sheet prepped at a non stressed pace, as well as just do other things. I was in no hurry once into the finals.
By today’s standards these were relatively small Canon captures, but I wanted the prints relatively big. As the proofs got bigger the combination of the image structure and paper surface texture needed something at final enlargement size. Seeing large silver prints by Lilo Raymond and Ralph Gibson from 35mm film, I learned that sharp crystalline grain gives the eye something to focus on in leu of tack sharp image enlarged information, and is a very beautiful image structure. I have a hi res drum scan of a 120 frame of Tri-X, of an even gray wall, developed in Rodinal. I found layering it with my captures particular ways, created a look that brought the imaged roundness, structure, paper surface, and the particular way uncoated paper presents the image in the paper, all together in an appealing, but unique, way.
As some of the images moved into full size proofs, a few unanticipated problems arose, which may be illuminating to others working with these papers. It took me a while to find a way to get my hands on unkinked, sheets. Ordering sheets on line was a disaster, uncrated at the distribution centers, counted out and repackaged to ship to me, bad handling there and by the shippers, or in store, customers flipping through drawers of sheets to view and select ruining most of them, etc etc.. Daniel Smith here in Seattle, still closed from Covid, found me an unopened, from Arches, pristine 50 sheet batch they would sell me “drive by”. That saved the whole project, imagine months, even years of work, only to be unable to get paper when finally ready to go.
 Strangely, at final size, the images had a moire pattern I’d never seen before, or on the monitor. I finally nailed it down to the grain image/ capture image, layering. For some reason the underlying pixel structure of each combined with a moire pattern, revealed on the monitor only at particular zoom sizes, and on paper (possibly the printer dither structure contributed) at full enlargement size. Another problem only revealed when nearly ready to print them all. After trying everything I could think of other than religion, the solution was the slightest amount of blur, visually undetectable, on the grain layer, before flattening.
Ink is liquid, obviously. Drop some water on a paper towel and it expands and buckles where wet. Uncoated papers absorb much more liquid into the paper than coated papers, and it expands, and ripples. With a lot of ink going down at image edges, then a large un-inked paper margin, there is an obvious wet/dry buckle at the margin. SInce the paper gets quite wet during printing, and the printer suction draws the wet paper into the transport rollers, a regular pattern of ridges forms. This happens with coated papers too, but rarely shows up except on heavily inked larger prints, and hard cross lighting. My friend Walker Blackwell taught me a good tight reverse roll while drying, right out of the printer solves the problem. But the problem with these large absorbent sheets was too severe. Worse, the rippling looked like a mechanical uneven inking problem in the image, even though it wasn’t. A lot of experimenting, I realized the back of the sheets needed to expand similarly to how the front, that had absorbed ink, had expanded resulting in the rippling. So, right when each print finished, I misted the back with a spray bottle, and rolled the print, image side in, so the backs would expand enough for a flat print after sitting rolled as the next print was proceeding. The look of a mechanical inking pattern disappeared as well.
I’ve been printing large format inkjet for almost 20 years since there were large Epsons, and smaller for years prior. I had never encountered any of these challenges before, and had to invent solutions just for this project. Some appeared only at full final size, never in all the smaller testing in preparation. There were others as well, but this is already way too long to describe them all. Needless to say any one of these, unless solved, could have killed the project. Of course, these are the kinds of things we run into when trying to print unconventionally, with materials made for other processes, non standard techniques, etc.. If any other worker is trying these kinds of things, and runs into similar challenges, I hope they happen across this writing.
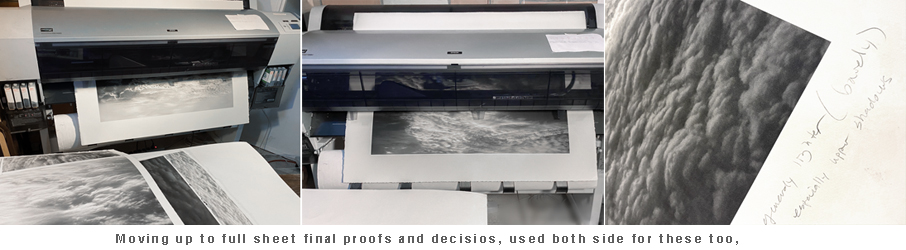
 So, the RIP ink setup is finalized and linear, a good batch of paper is ready, the printer is working well, I’m satisfied with final proofs of each of the ten images, all ready to print. I’m going to do an edition of three, and one set of A/Ps for me. Forty prints, I have 50 sheets of paper, each will take over an hour. I set up the room so each step could be accommodated, 29 x 41” sheets, in my small basement. Interleaves were pre-cut from a roll of glassine. The image is brought up in the RIP, a nozzle check is done, new piece of paper brushed, the deckles bent backwards to avoid catching the print head, and positioned into the printer, start the print. When completed after and hour +, it’s placed face down on a large sheet of mylar, the back misted, flipped over and the whole thing rolled in an old 44” paper roll and set aside. Then the next image set up in the RIP, nozzle check, brush and load the paper, print. Just before the hour is up, unroll the previous print flat, place a glassine interleave sheet over it, a large clean piece of plexiglass over that and some weight. Remove the completed next print from the printer, spray, roll, start next print.. etc etc…
 I think I did six or seven on my best days. If a nozzle check wasn’t perfect, I’d have to run cleaning cycles, a pause in the process. A few days the nozzles were repeatedly pretty bad, and it’s best to not go crazy with cleanings, and just let it sit for an hour or more, do another cleaning and walk away, eventually it is perfect again and might be for a few days. It was spring and early summer, some days I didn’t print at all. But if the printer is happy it’s best to keep going. There were only 2 rejects, both my mistakes, so not bad, out of forty prints, eight sheets to spare.
I’ve printed a lot of work for others, much larger prints, larger quantities, more traditional challenges. For reasons obvious from above this was one of the more challenging print projects, partly because I was after something different for this work, which means I created a lot of my own unforeseen problems then had to come up with unforeseen new solutions.


Hi Tyler,
Hope you and Beverly are doing well, in these strange days. Great description of your process for the cloud prints, so good to hear the total workflow, all the details, and the unique steps for this particular project. The prints look wonderful. Do you always print the entire edition at once?
I have a few sheets of very nice Hankusa Gampi that I want to print on, about 16×20, at 90 grams/sq meter. Although Hiromi indicates the paper is not sized, the front surface, which is pure gampi, is very smooth and has a “sized” feel to it. The back surface is a kozo-gampi mix, rougher texture, so your misting and rolling technique might be helpful, I never thought of that.
The deckles on this paper are very thin and feathery, and largely translucent. Pressing and bending the deckles back does not seem to prevent ink spatter from the printhead, even with wide blank borders. It would be nice if the printers had a control to limit print head travel to the width of the actual print, not the entire carriage.
I often have a problem with the suction ridges when I print on very thin coated papers (like 48 gsm kozo), which I solve by feeding 2 or 3 sheets at a time, or occasionally by actually ironing the print from the back after it is well dry, which usually works and tends to give some papers a parchment-like appearance.
I think I saw that you and Corwin hit the road a while ago; good for you! My travel for the last 15 months has been limited to central WA, mostly Tieton area, Crab Creek and Waterville Plateau (lots of glacial and flood erratics).
Sold a couple of BW prints in the 10×10 show this year, and I have an exhibition (probably solo) at the BOXX Gallery in Tieton next spring. The pressure mounts!
Anyway, I always enjoy and learn from your detailed printing explanations. Thanks for the info and the insights.
All the best!
John
ps I bought a book from your friend Lauren Henkin about her Props sculpture project. Simply great work!
Hi John.. the long answer(s)- I’ve printed entire editions only a few times, and never big editions. My setup will change now, and I won’t be able to go back and print more of these, and it’s somehow satisfying to be completely done with these after all the hemming and hawing.
Cone showed me an approach long ago that would solve the feathery deckles, but you need a backing sheet larger than the print sheet, so you have to account for that with a larger canvass size to suit. There is a tape made by the post-a-note people, that is thin, paper, and barely sticks so pulls off easily leaving no adhesive behind, exactly like a post-a-note. Last time I got it I found it on amazon, and also bought it at office depot once. So basically you have a larger sheet of something, anything would work, even bond probably, as long as the combined thickness goes through the printer OK, the print paper edges/deckles taped down all the way around. The sandwich goes though and you just pull the tape and the print off the backing sheet when done.
Yes this little trip, I actually now have some scanned film from it to see what I can make. I love those areas you mention and have been a few times, with variable photographic success.
Hope you spread the word when your show is up, might be an excuse for a drive, after all you came all the way to Stevenson. Hope some of the above helps, and I appreciate your comments.